To clean a Rinnai tankless water heater, turn off power and water, remove and clean the inlet filter, then descale the unit using a descaling solution. Regular maintenance ensures optimal performance and longevity of your water heater.
Neglecting cleaning can lead to reduced efficiency and potential malfunctions. Proper care of your tankless water heater will save you money in the long run while providing you with a reliable source of hot water. Follow these simple steps to keep your Rinnai tankless water heater in top condition and avoid costly repairs.
Regular maintenance is key to ensuring the efficiency and longevity of your tankless water heater.
Preparation
Start by turning off the unit, disconnecting power and water supply. Remove the filter, clean with a brush and reinsert. Flush with vinegar to remove scale buildup. Reassemble the components and power up the unit for a clean and efficient Rinnai Tankless Water Heater.
Gathering Materials
Bucket
Vinegar
Soft-bristled brush
Rags or towels
Screwdriver
Safety Precautions
Turn off water and gas supply
Allow the unit to cool
Wear gloves and protective eyewear
Keep a fire extinguisher nearby
Shut Down And Cool Down
Properly shutting down and cooling down your Rinnai tankless water heater is essential for maintenance.
Turning Off The Power
Step 1: Locate the power source of your Rinnai tankless water heater.
Step 2: Switch off the unit by turning the power dial to the ‘Off' position.
Allowing The Unit To Cool
Step 3: Wait for the unit to cool down before attempting any cleaning or maintenance.
Step 4: Give it at least 30 minutes to ensure it is safe to touch.
Accessing the heater of your Rinnai tankless water heater is the first step in performing a thorough cleaning to maintain its performance and longevity.
Removing The Cover Panels
To access the internal components, you’ll need to start by removing the cover panels. These are typically located on the front of the unit and can be easily detached by using a screwdriver to loosen the screws holding them in place.
Locating Internal Components
Once the cover panels are removed, you can locate the internal components of the water heater, including the burner assembly, heat exchanger, and water flow sensor. These are essential parts that require attention during the cleaning process to ensure the unit operates efficiently.
Cleaning your Rinnai tankless water heater regularly is essential to ensure its optimal performance and longevity. By following a simple cleaning process, you can keep your tankless water heater in top shape and enjoy a continuous supply of hot water for years to come. In this section, we will guide you through the cleaning process, covering important steps such as cleaning the heat exchanger and flushing the system with vinegar.
Cleaning The Heat Exchanger
The heat exchanger is a crucial component of your Rinnai tankless water heater responsible for heating the water. Over time, minerals and debris can accumulate on the heat exchanger, reducing its efficiency and affecting the overall performance of your heater. Cleaning the heat exchanger is relatively simple and can be done using a few basic steps:
Turn off the power supply: Before starting the cleaning process, make sure to turn off the power supply to your tankless water heater. This step is crucial to ensure your safety during the cleaning process.
Access the heat exchanger: Locate the heat exchanger on your Rinnai tankless water heater. It is usually positioned behind a cover panel that can be easily removed with a screwdriver or by following the manufacturer’s instructions.
Inspect the heat exchanger: Once you have accessed the heat exchanger, visually inspect it for any signs of mineral buildup or debris. If you notice any significant accumulation or blockage, it’s time to clean it.
Clean the heat exchanger: Use a soft brush or a non-metallic scrub pad to gently remove any buildup or debris from the heat exchanger. Be sure to be thorough but gentle to avoid damaging the delicate components of the heat exchanger.
Reassemble and restore power: Once you have cleaned the heat exchanger, reassemble the cover panel and securely fasten it. Finally, turn the power supply back on and wait for your Rinnai tankless water heater to resume normal operation.
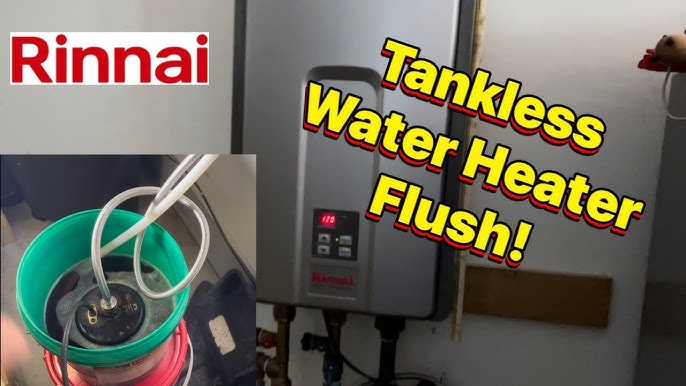
Flushing The System With Vinegar
Flushing the system with vinegar is an effective method to dissolve mineral deposits that may have accumulated in the internal components of your Rinnai tankless water heater. Vinegar’s acidic properties make it an excellent natural cleaner for removing stubborn mineral buildup. Here’s how you can flush the system with vinegar:
Turn off the power supply: As a safety precaution, turn off the power supply to your tankless water heater before performing any maintenance or cleaning.
Locate the service valves: Find the service valves on your Rinnai tankless water heater. These valves allow you to isolate the water heater from the rest of your home’s plumbing system.
Close the service valves: Turn both the hot and cold water service valves to the closed position. This ensures that the vinegar solution flushes through the tankless water heater only.
Prepare the vinegar solution: Mix a solution of equal parts white vinegar and water. The amount of solution required may vary depending on the size of your tankless water heater. Consult your Rinnai product manual for more specific instructions.
Connect and flush with the vinegar solution: Connect a hose to the cold water inlet valve of your tankless water heater. Place the other end of the hose into a bucket or drain. Open the hot water service valve and pour the vinegar solution into the tankless water heater. Let the solution flow through the unit and out of the hose, effectively flushing away mineral deposits.
Rinse and restore normal operation: Once the vinegar solution has flushed through the system, disconnect the hose and close the hot water service valve. Flush the tankless water heater with clean water to rinse any remaining vinegar solution. Finally, open the service valves, restore the power supply, and your Rinnai tankless water heater will be ready to go.
Reassembling The Heater
To clean a Rinnai tankless water heater, first, turn off the gas and water supply. Disassemble the heater and use a vinegar solution to remove mineral buildup. Reassemble the unit, ensuring all components are securely back in place before turning the gas and water supply back on.
Putting Back The Cover Panels
Now that you have thoroughly cleaned the Rinnai tankless water heater, it’s time to put the cover panels back in place. Follow these simple steps to ensure a secure and properly sealed reassembly:
Starting with the bottom cover panel, align it with the corresponding slots on the unit.
Gently push the panel into place until it is snug.
Next, move on to the middle cover panel and repeat the same process.
Finally, insert the top cover panel and ensure it is properly aligned.
Remember to handle the cover panels with care to avoid any damage or scratches.
Restoring Power And Testing
Once the cover panels are securely in place, it’s time to restore power to the Rinnai tankless water heater and test its functionality. Follow these steps to complete the reassembly process:
Locate the power switch or circuit breaker associated with the tankless water heater.
Flip the switch or reset the circuit breaker to the “On” position, restoring power to the unit.
Allow the water heater to go through its initial startup sequence, which may take a few minutes.
Once the startup sequence is complete, turn on the hot water faucet in the nearest sink or shower.
Check if the water flows consistently and reaches the desired temperature.
If you notice any issues or irregularities during the testing phase, refer to the Rinnai tankless water heater’s user manual or contact a professional technician for assistance.
Ensuring a proper reassembly of the cover panels and testing the functionality of the Rinnai tankless water heater are essential steps in maintaining its efficient operation. By following these guidelines, you can ensure the longevity and optimal performance of your tankless water heater.
Credit: www.waterheatersnow.com
Maintenance Tips
When it comes to keeping your Rinnai tankless water heater in optimal condition, regular maintenance is crucial. By following a consistent maintenance schedule and being mindful of potential signs of heater troubles, you can ensure that your unit functions efficiently and effectively for years to come. Below, we'll outline key maintenance tips, including a regular maintenance schedule and signs to watch out for.
Regular Maintenance Schedule
Check the inlet water screen: Remove the filter and clean any debris that may have accumulated.
Flush the unit: Use a vinegar solution to flush out any mineral buildup, ensuring the unit maintains optimal performance.
Inspect the vent system: Ensure the venting system is free of obstructions and debris to prevent potential hazards.
Check for leaks: Regularly inspect the unit for any signs of leakage and address any issues promptly.
Monitor water pressure: Keep an eye on the water pressure to ensure it remains within the recommended range.
Signs Of Heater Troubles
Fluctuating water temperature: If you notice inconsistent water temperatures, it may indicate a problem with the heater.
Reduced water flow: A decrease in water flow could signal a potential issue with the unit that needs to be addressed.
Strange noises: Unusual sounds coming from the unit may be a sign of internal complications that require attention.
Error codes: Pay attention to any error codes displayed on the unit, as they can indicate specific issues that need to be resolved.
Changes in energy efficiency: If you observe a noticeable change in the unit’s energy efficiency, it could signify a problem that needs to be investigated.
Credit: www.youtube.com
Conclusion
In sum, regular maintenance is crucial to keep your Rinnai tankless water heater in optimal condition. By following the simple steps outlined in this guide, you can ensure efficient performance and prolonged lifespan. Remember, a well-maintained water heater not only saves you money on energy bills but also contributes to a greener environment.